This is How to Create Online Store With Only 15 Minutes Time! (Tutorial)
Intention alone is not enough to build your online business. It needs real action to execute it.
Sometimes, you have a very good plan to build this business from scratch. However, do not let the expectations of planning that are too high even make you hesitate and give up before the fight.
For that, think your business planning coherently. Starting from how to determine your target market, find products to sell, and other basic things you need to know to build your online business from scratch.
Online business will only be able to run optimally if you have an online store. That's the key! So, be prepared to follow the following guidelines, related to how to open an online store in just 15 minutes!
First, you can choose the media platform you will use for online stores.
Many websites offer online store platforms.
For example like Magneto, BigCommerce, and also Shopify. However, the following guidelines will explain how to use Shopify as a platform to build your online store.
Step 1: Sign up for Shopify
Obviously, to use the online store platform in Shopify, then you must first register first.
Fortunately, at Shopify you do not have to pay while still in the exploratory stage (experiment). By simply entering an email address, then you can try using the online shopshops platformShopify for 14 days and see if this platform is the right thing for you.

After filling in the email address, it will appear another form that requires you to fill in your email address, password, and the name of your online store.
You need to remember, that later you can change the name of your online store (this is only a prerequisite). Once everything is filled, then click the 'Create your store' button to continue.
Jp
Wait a few seconds for the system to respond to your online store. Next, the system will offer whether you want to open an online store or Shopify Retail POS.
However, if you want to create your own online store then choose 'Online Store' menu.

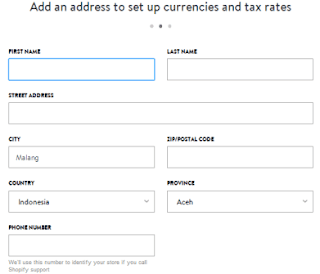
On the next page, enter your full name, address, and contact information. This will help the Shopify party set the currency and tariff standards. If it is, then click 'next'.
Then, Shopify will ask you to explain about your business. This will only help them get information to assist you in getting customers, so Shopify can help you and improve your online store system in the future.
Determine how long you sell, how much you plan on creating an online store. And did you create this online store for one of your clients. The questions you will meet.
If all the forms have been filled, then click the 'Enter my store' button to continue.

Step 2: Launch Your Online Store
If you succeed in this second stage, then you will see your online store dashboard through Shopify.
When you see the initial appearance of the dashboard, then you will feel more familiar. Yes, this initial look is very similar to WordPress.

You now have three steps to start selling online. To get started, scroll down a bit and click on the 'Add Product' button. Starting here, you are required to provide details of your first product.

In this tutorial, I will exemplify by selling Samsung Grand Prime smartphone product.
If the product is very clear, it is time to enter the title, description, product type, and vendor, and upload the product image.
Remember, do not forget to add some tags that are still related to your product to help people search for your product based on things like colors, sizes, and other things.

This is where you are logged in to describe your product description. For that, fill in comparative prices if necessary, SKU numbers, tax info, and more.
In fact, it also includes areas for managing your inventory (if you have a limited number of products).
Replace the 'off' option if you have multiple options, so you can also include details of things like the color and size of your product.

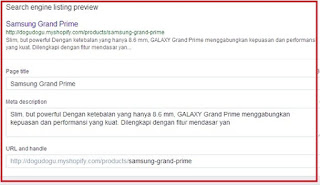
The next step, this is closely related to SEO and Visibility. For that, use SEO Default, and fill in the title, and metadescription according to your product description.
Then, let the system know that you want your product to be visible to the world. After that, click 'save product'.
After this step is complete, it will return to your dashboard page, and click on the 'edit your theme' button to customize the look of your website.

In this step, everything is really up to your kretivitas. It depends on how you want to design the front view of your online store and make it look more attractive.
As a recommendation, start by uploading the image for your logo and changing the website's default color to align the color composition with the online store logo you have previously set up.
You can also click other tabs to change the look of other things, such as homepages, product pages, footers, and checkouts.

Once you are free to expression with the various settings you try, and have not really been sure of the settings you previously selected, then click preview in the new window to see the look of your online store.

You can also click the 'Visit the Theme Store' menu to grab the theme links for free or premium that are already set up for you.

After choosing a theme that you feel is right, then click the 'publish change' button and return to the dashboard.
In the meantime, your store can run. However, your domain name still uses Shopify's property like 'namasite.myshopify.com.' Actually, this has no effect on the performance of your online store.
It's just that, to increase the credibility of the online store you just built, you'll want to buy a domain to show that your online store is really bona fide.
For that, you can click 'Setup Domain' to get started.

You must choose whether you want to register a new domain name or you just want to register it. This means you have to pay your credit card.
If you choose to register a new domain, then you just have to search the domain name until absolutely no one uses it. Next, just make a purchase confirmation using your credit card.

Once everything is done, then you can go back to the dashboard and can start to launch your online store. Of course, Shopify will ask you to choose a plan after the trial period ends.
Step 3: Manage the Payment Prose
Even if you have already setup a set up for your new online store, you still have to understand the payment system if there is an order from the customer.
Click the 'Settings' tab, and select 'Payments' located on the left side of your dashboard. Select the default option in Shopify Payments.
Click the Shopify Payments account settings to configure settings such as SSN, how many orders, even up to information about bank accounts for future payments.

You also have the option to make the payment process like PayPal, BitPay, or GoCoin.
If you've ever experienced using a payment system one of them, then it would not hurt to try it.
However, personally recommend to choose the Shopify option. This is because, Shopify will work more perfectly with the entire system and based on many opinions, you will get better support directly through Shopify.
By this, it means you do not have to deal with two separate companies.
Unfortunately, I still do not have any products to sell online!
Instead of many times in this article has been mentioned, do not have to have products in advance to run an online business. In fact, without having to wait to have a product first, you can still run it.
How to? The solution is to run a dropship business.
One online store that offers products for reseller and dropship needs is www.Supplier.id.
Through Supplier.id, you can find a wide range of goods at low prices, ranging from gadgets, accessories, home & living, to fashion.
Not only that, by joining a reseller and dropshipper in Supplier.id, then you can sell online without having a stock of goods in your place.
In fact, Supplier.id can immediately send your customer orders directly, without you have to be preoccupied with packing goods and make delivery.
It will take more time, if?
There is so much more you can do after starting to build an online store with Shopify. However, it will take more than 15 minutes. If you want to further explore the online store through Shopify, you can use the 'Shopify App Store' feature. Especially, if you intend to see just about anything you can add to maximize the performance of your online store.
But in spite of it all, you really have an online store with just 15 minutes.
Congratulations! This is a simple process to build an online store using a platform just like Shopify.
Because, Shopify is not a software that you need to enable or install it first before using it. You'll just go through a pretty quick setup procedure to do it.
How, easy enough is not to make a store with just a short time?
Then, are you interested also to create an online store through a similar platform like Shopify?
Or, have you used another online store platform?
Let's share the experience by filling out the comment field below.
Seriously, It Will Only Take 15 Minutes Only!
"Shopify offers a variety of facilities in the installation process.
Not only that, you can also choose an online store template that suits your needs.
Of course, this will make it easier for you to build an online store, and soon you can sell products with your own brand of business.
Sometimes, you have a very good plan to build this business from scratch. However, do not let the expectations of planning that are too high even make you hesitate and give up before the fight.
For that, think your business planning coherently. Starting from how to determine your target market, find products to sell, and other basic things you need to know to build your online business from scratch.
Online business will only be able to run optimally if you have an online store. That's the key! So, be prepared to follow the following guidelines, related to how to open an online store in just 15 minutes!
First, you can choose the media platform you will use for online stores.
Many websites offer online store platforms.
For example like Magneto, BigCommerce, and also Shopify. However, the following guidelines will explain how to use Shopify as a platform to build your online store.
Step 1: Sign up for Shopify
Obviously, to use the online store platform in Shopify, then you must first register first.
Fortunately, at Shopify you do not have to pay while still in the exploratory stage (experiment). By simply entering an email address, then you can try using the online shopshops platformShopify for 14 days and see if this platform is the right thing for you.

After filling in the email address, it will appear another form that requires you to fill in your email address, password, and the name of your online store.
You need to remember, that later you can change the name of your online store (this is only a prerequisite). Once everything is filled, then click the 'Create your store' button to continue.
Jp
Wait a few seconds for the system to respond to your online store. Next, the system will offer whether you want to open an online store or Shopify Retail POS.
However, if you want to create your own online store then choose 'Online Store' menu.

On the next page, enter your full name, address, and contact information. This will help the Shopify party set the currency and tariff standards. If it is, then click 'next'.

Then, Shopify will ask you to explain about your business. This will only help them get information to assist you in getting customers, so Shopify can help you and improve your online store system in the future.
Determine how long you sell, how much you plan on creating an online store. And did you create this online store for one of your clients. The questions you will meet.
If all the forms have been filled, then click the 'Enter my store' button to continue.

Step 2: Launch Your Online Store
If you succeed in this second stage, then you will see your online store dashboard through Shopify.
When you see the initial appearance of the dashboard, then you will feel more familiar. Yes, this initial look is very similar to WordPress.

You now have three steps to start selling online. To get started, scroll down a bit and click on the 'Add Product' button. Starting here, you are required to provide details of your first product.

In this tutorial, I will exemplify by selling Samsung Grand Prime smartphone product.
If the product is very clear, it is time to enter the title, description, product type, and vendor, and upload the product image.
Remember, do not forget to add some tags that are still related to your product to help people search for your product based on things like colors, sizes, and other things.

This is where you are logged in to describe your product description. For that, fill in comparative prices if necessary, SKU numbers, tax info, and more.
In fact, it also includes areas for managing your inventory (if you have a limited number of products).
Replace the 'off' option if you have multiple options, so you can also include details of things like the color and size of your product.

The next step, this is closely related to SEO and Visibility. For that, use SEO Default, and fill in the title, and metadescription according to your product description.
Then, let the system know that you want your product to be visible to the world. After that, click 'save product'.

After this step is complete, it will return to your dashboard page, and click on the 'edit your theme' button to customize the look of your website.

In this step, everything is really up to your kretivitas. It depends on how you want to design the front view of your online store and make it look more attractive.
As a recommendation, start by uploading the image for your logo and changing the website's default color to align the color composition with the online store logo you have previously set up.
You can also click other tabs to change the look of other things, such as homepages, product pages, footers, and checkouts.

Once you are free to expression with the various settings you try, and have not really been sure of the settings you previously selected, then click preview in the new window to see the look of your online store.

You can also click the 'Visit the Theme Store' menu to grab the theme links for free or premium that are already set up for you.

After choosing a theme that you feel is right, then click the 'publish change' button and return to the dashboard.
In the meantime, your store can run. However, your domain name still uses Shopify's property like 'namasite.myshopify.com.' Actually, this has no effect on the performance of your online store.
It's just that, to increase the credibility of the online store you just built, you'll want to buy a domain to show that your online store is really bona fide.
For that, you can click 'Setup Domain' to get started.

You must choose whether you want to register a new domain name or you just want to register it. This means you have to pay your credit card.
If you choose to register a new domain, then you just have to search the domain name until absolutely no one uses it. Next, just make a purchase confirmation using your credit card.

Once everything is done, then you can go back to the dashboard and can start to launch your online store. Of course, Shopify will ask you to choose a plan after the trial period ends.
Step 3: Manage the Payment Prose
Even if you have already setup a set up for your new online store, you still have to understand the payment system if there is an order from the customer.
Click the 'Settings' tab, and select 'Payments' located on the left side of your dashboard. Select the default option in Shopify Payments.
Click the Shopify Payments account settings to configure settings such as SSN, how many orders, even up to information about bank accounts for future payments.

You also have the option to make the payment process like PayPal, BitPay, or GoCoin.
If you've ever experienced using a payment system one of them, then it would not hurt to try it.
However, personally recommend to choose the Shopify option. This is because, Shopify will work more perfectly with the entire system and based on many opinions, you will get better support directly through Shopify.
By this, it means you do not have to deal with two separate companies.
Unfortunately, I still do not have any products to sell online!
Instead of many times in this article has been mentioned, do not have to have products in advance to run an online business. In fact, without having to wait to have a product first, you can still run it.
How to? The solution is to run a dropship business.
One online store that offers products for reseller and dropship needs is www.Supplier.id.
Through Supplier.id, you can find a wide range of goods at low prices, ranging from gadgets, accessories, home & living, to fashion.
Not only that, by joining a reseller and dropshipper in Supplier.id, then you can sell online without having a stock of goods in your place.
In fact, Supplier.id can immediately send your customer orders directly, without you have to be preoccupied with packing goods and make delivery.
It will take more time, if?
There is so much more you can do after starting to build an online store with Shopify. However, it will take more than 15 minutes. If you want to further explore the online store through Shopify, you can use the 'Shopify App Store' feature. Especially, if you intend to see just about anything you can add to maximize the performance of your online store.
But in spite of it all, you really have an online store with just 15 minutes.
Congratulations! This is a simple process to build an online store using a platform just like Shopify.
Because, Shopify is not a software that you need to enable or install it first before using it. You'll just go through a pretty quick setup procedure to do it.
How, easy enough is not to make a store with just a short time?
Then, are you interested also to create an online store through a similar platform like Shopify?
Or, have you used another online store platform?
Let's share the experience by filling out the comment field below.
Seriously, It Will Only Take 15 Minutes Only!
"Shopify offers a variety of facilities in the installation process.
Not only that, you can also choose an online store template that suits your needs.
Of course, this will make it easier for you to build an online store, and soon you can sell products with your own brand of business.


Comments
Post a Comment